Monday, 28 July 2014

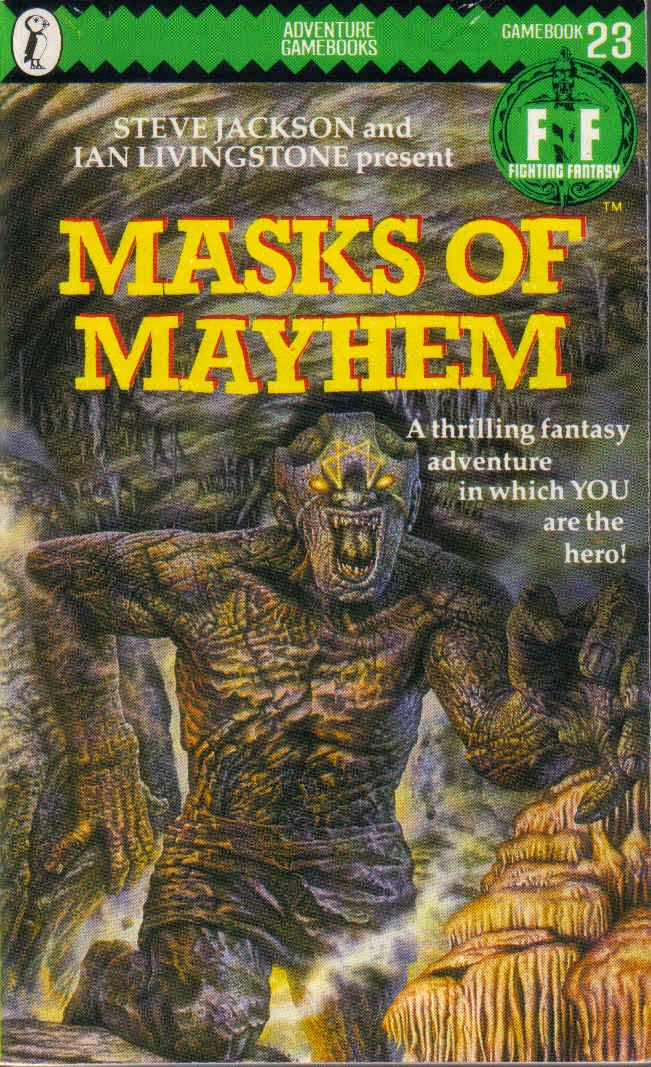
#23: Masks Of Mayhem

 MASKS OF MAYHEM

Robin Waterfield

Reviewed by Mark Lain

Robin Waterfield’s second FF was his first medieval offering (his first book, #18 Rebel Planet being a Sci-Fi outing) and was still only the fourth book in the series to be set in Khul. Opinion amongst the fan community always seems to have been polarised over this book – some love it, some intensely despise it, and it is true that there is certainly a lot of great material here as well as there being many valid reasons to hate it.

The plot puts you in the role of the King or Queen (the intro cleverly uses the term “ruler” to avoid any gender bias) of Arion in north-east Khul. Your sidekick wizard, Ifor Tynin, summons you (again, a thoughtful piece of writing points out that his knowledge of magic makes him your equal, otherwise being summoned by a subordinate would be peculiar) and tells you that the fell sorceress Morgana is planning on wreaking widespread havoc by unleashing eleven undead golems on the world. But there’s more to it than this as each golem wears a mask she has made using each of eleven special sigils that hold the keys to power over everything. She now only needs the twelfth sigil (the “one ring to rule them all” then) and she will be able to control her creations. Your job is to find and kill her before she gets hold of sigil #12. Confused? You probably will be, but there is so much to the plot as it unravels throughout the book that you can’t help but give credit to RW for creating such a thorough concept and this is definitely one of the densest FF storylines around. The people of Arion have a very small-town mentality and no-one ever bothers to venture far (not even you, so presumably there are never any diplomatic trips to anywhere else) meaning you really are stepping into oblivion. There is a map of the area, but, other than knowing the general direction you want to go in, what lies ahead is a frightening mystery. In plot terms, what lies ahead is a trek across various terrains (forest, hills, marsh, plain, river, icy mountains – so, most of the possible options, really), meeting several key NPCs who can help you in your task, collecting numerous often incredibly well-hidden items, and, most intriguingly, discovering that you actually have the twelfth sigil on your helmet meaning it was all a big ruse to lure you to Morgana’s lair. Plus, there’s a traitor added to the mix who is actually in league with her. Overall, this FF has a plot that is logical (if you can keep up with it all), is surprising, and is genuinely well-planned.

As an adventure, the number of different environments makes for a very varied experience and there is intelligence on show both in terms of the writing and of the design to it all that makes it rise above just being a bog-standard medieval journey type of adventure. Effectively, it can be broken down into a series of cameos, but they are all equally interesting and some are very perilous. You start with the choice of a forest or hills (we won’t count the third option of trying to cross Lake Nekros as that kills you instantly if you pick it) then you descend into a disused mine as you try to reach Fallow Dale en route to Castle Hever where you need to rendez-vous with another King to get him to give you his Horn, which you are told is an essential to success. He asks you to undertake a side mission (catching a Sabre-Toothed Tiger for him) which is a fun diversion played out on a grid map where rolling the die progressively determines what direction your hunting dogs go in and then what the tiger does. From here you cross the Pikestaff Plain where a very interesting and unusual mechanic comes into play whereby whether you choose to follow some ants around for a bit or not then unlocks a slightly different turn of events – I like this as it is nice to see an attempt being made to subvert linearity in FFs. Then follows a real killer when you get caught in a bush-fire and it can take several attempts to beat this section as you burn to death horribly over and over. Next is a ravine/river part which hides one of the hardest to find and most important items in the book, then there is an optional trip into the lovely-sounding Marsh Vile, another lethal section where any false move leads to death, but it is possible to be given the solution to surviving the marsh by talking to someone just before you enter, even if the true path through it turns out not to be exactly what you are told. Finally, you enter the snow-capped mountain range of Krill Garnash which is Morgana’s domain. Negotiating the Affen Forest section takes a bit of thought as you encounter some particularly wary and astute Elves, the mine can be bit disorientating as you have to double-back on yourself, and the river part is a nightmare designed to make you fail. Whilst the bush-fire and Marsh Vile do make sense in their lethal-ness, it can get frustrating as you fail to get through each one umpteen times. The really key cameos involve having to find hidden paragraphs (by turning to sections you have previously been told about or, more often, by multiplying or adding section numbers to/with various numbers of things you have found) and RW takes the hidden paragraph-ary to all new levels as there are so many numerical challenges at make or break points that it can become quite demoralising if you manage to beat the first handful only to be faced with yet another one seemingly ad nauseum. RW loves extremely complex mathematical concepts in his FFs (Rebel Planet has its very tough binary code solution and the end of Deathmoor makes you do probably the most complicated calculation that I’ve ever seen in a FF book) but Masks Of Mayhem’s over-reliance on this really takes it a bit too far and it does get slightly soul-destroying, especially in the glade where you find Vashti which puts you through a relentless catalogue of number-crunching exercises. OK, so this is all intended to make cheating impossible and to give a more satisfying challenge level, but taking it to this extreme also makes winning practically impossible too! The final insult comes right at the end where you have to identify who the traitor is before they literally stab you in the back. The clues to the traitor’s identity are so subtle as to be near non-existent and you are not even explicitly told that you need to do any particular sums or whatever with the relevant character’s name even if you can figure it out - the solution is "40" from his name "I-forty-nin" but it's unlikely many people will ever guess it as it's so obscure. It is possible to make a lucky guess as to what to do, but it is more likely that most people will just give up out of frustration (or despair at having to do yet more maths) at this point, which is a shame given the general quality of the adventure as a whole.

But it’s not just the maths and sheer volume of number clues that you have to find that make this seem rather oppressive in its difficulty: the amount of testing of both Skill and Luck that you have to contend with is excessive, especially as failure will almost always lead to death; there are two different stages where your Provisions’ restorative value is reduced to +3 Stamina rather than the usual +4 which, coupled with the ridiculous number of times you are forced to eat or suffer the consequences (ok, the mission lasts several days so this does make sense in context, but any suggestion of freedom to use your Provisions when you feel inclined is lost completely) seems a little unfair; and, the “essential” Horn of Hever (the focus of the first part of the mission) is actually pretty useless and makes no difference to your eventual success, plus the seemingly very handy Skill advantage it gives you against evil foes hardly ever does anything as most of what you fight is specifically stated to not be evil.

On the other hand, combats in general are not especially difficult (even the Ice Dragon only has Sk 10 St 14 which is very weak for a Dragon) and only the really strong creatures and foes have Staminas in double-figures, but the Giant Blood-sucking Spider does seem overly-strong for an insect type with St 14 (ie the same as the Dragon!) Morgana herself is very weak (for an end baddie) with Sk 11 St 6, although the book does explain that she is frail but highly-skilled in magic so this is a good bit of planning. A bigger gesture towards helping the player out a little bit is that this book uses the traditional FF rules with no extra stats and you start out with the basic equipment, 10 Provisions, and a choice of the three standard Potions (Skill, Strength or Fortune.) Given how many Luck tests you are faced with, the best choice by far is the Fortune Potion (as long as you start with a decent Skill score, of course) and the extra point it gives will prove very useful. Stats-wise, this book cannot realistically be beaten without both Skill and Luck in double-figures, plus a decent Stamina score will get you through all the eating-related moments and the parts where you have no choice but to take damage.

Clearly then, this book is noticeably weighted against the player and this is no more so apparent than through the sheer number of instant deaths (I count 40-plus and some can be reached from more than one section), some through failing Skill or Luck tests, but the majority seem quite irrational eg: just wandering off into the mist never to be seen again, or getting arbitrarily eaten by things. After a while, taking a wrong turn and instantly dying all the time becomes very wearing and repetitive, which is at odds with the really well designed plot and adventure elements. It is in fact possible to die after your first choice (three paragraphs in), which sets the tone for the rest of the book. Whilst there is some variety to the route you can take (you can choose to do the forest and the marsh or not bother with either or both and it won’t affect you too much) and the “ant following or not” episode offers variations on a set of outcomes, the vast majority of this book is very linear with the emphasis being far too much on collecting several very hard-to-find items, not losing your helmet (difficult in the river section), and, most fun-destroying by far, having to collect way too many number clues.

Were it not for its extreme harshness, this could have been one of the best “out-and-about” epic trek FFs ever as its depth of plotting, its two shock revelations, and its ability to maintain the interest through vivid descriptions, variety of events, and genuine sense of a voyage of discovery as you pass through areas that were only known to you by name and reputation, all ought to amount to a brilliant book. If you were to strike it lucky and find the true path after only a handful of playthroughs (thus avoiding most of the umpteen unfair instant deaths that blight the book), meaning you mostly are exposed only to the excellent design, rather than to RW’s cruelty to the player, then you would happily accept this as a brilliant FF. Sadly, it is so hard that the more times you play means the more times and ways that you will die, and, even after beating one part, you will probably only wind up dead shortly afterwards, especially as the bush-fire is followed quickly by the river and then a few sections later you might have to deal with Marsh Vile. In other words, the feeling that the good parts were wasted by making it so unfair will get the better of your wanting to think that this is brilliant sooner or later.

I am a big fan of Waterfield’s vivid descriptions and the effort he usually (the dismal Deathmoor excepted) puts into creating a believable and thorough world in which his adventures play-out and the writing here is mostly above average, even if some of the deaths make no sense when you think about them and paragraph 400 is the kind of thing Andrew Chapman or Luke Sharp would be embarrassed to write it’s so short and anti-climactic, especially given the epic scale and sheer difficulty of what you’ve gone through to get there. A really big plus of his effort in this book is the imaginative creature design and there are some unusual and intriguing inclusions here such as the Blackhearts (evil Elves that you thought were extinct), the Spriggan (hideous overweight fairies), the Doragar (Orc-Troll crosses bred for hard labour tasks), and two mutations of more familiar creatures, the Chion and the Ice Hulk. All these add to the idea that Khul and Allansia have their own distinct races and species which makes Khul seem very different to Allansia, when it could so easily have just been a clone where non-IL/SJ FFs were set, which would have been a shame.

A real plus-point in this book is Russ Nicholson’s art. He has really excelled himself in places 
with this one and some of his best internal art is on show. If you get fed up of dying all the time, the art will hold up in itself and he mixes the style seen in his early FFs with a darker-looking more intricate approach in places, making this a really nice selection of varied art that shows nuances such as day and night or intelligence/stupidity of encounters very well. John Sibbick’s cover focuses on one of the Golems which, whilst they are part of the main purpose of your mission, only actually get one paragraph given to them of actual adventure so it is useful to be able to visualise them via the cover. There’s an elemental earthiness to the cover image and the weird all-important sigil is highlighted so the cover ultimately complements the plot and adds another layer of richness in your being able to “see” what is happening.

Masks Of Mayhem is not an easy book to summarise. Its design and ongoing interest make it a winner, but RW’s total disregard for player enjoyment due to it simply being unfair also makes it very hard not to get fed-up with it. This should have been a great book, but sadly it just ends up being frustrating. Appreciate the superlative plot and the art, but hate the fact that death or not finding enough number clues will get boring after a while. This deserved to be so much better...

Thursday, 10 July 2014

#25: Beneath Nightmare Castle


BENEATH NIGHTMARE CASTLE

Peter Darvill-Evans

Reviewed by Mark Lain

Book #25 in the original series is something of a turning-point. It was the first to be released with the gold dragon cover and was the last one I got on initial release. I don’t know whether the move from the iconic green zigzag cover design did for me, or if I was just moving onto other things then, but it would be several years before I would return to the series. Stylistically and thematically this was a major swing and heralded what was to come in the more adventurous books from the 30s and (especially) the 40s parts of the series. This was the first “what the hell is going on?” book, where you really have no idea what you are trying to achieve until you start to play. Previously, the FF books’ premises were laid-out on a plate and the point was basically just to win, rather than to figure the mystery out and then win. Here the notion is introduced of gradually unravelling a mystery and allowing the story to develop as you explore, rather than submerging yourself in a pre-defined idea (although a key NPC encounter early on can tell you everything you really need to know and also that you are a “chosen one” figure.) It is also the first genuinely dark and often disturbing FF book. Granted, #10 House Of Hell was quite frightening, but in an Old Dark House, Grand Guignol sense. The terror is presented in a rather more unsettling fashion in BNC, and there are some very warped recurring motifs and regular use of repulsion-inducing terms such as “protoplasm”, “slime”, “tentacles”, “ooze”, “acid”, and “glutinous”. Also, the instant deaths are presented in unusually long (for deaths) paragraphs that relish in describing in graphic detail exactly how horribly you are dying. Some have suggested that this is a full-on Horror genre piece, but I disagree – this is still Fantasy writing, but in its darkest, Call Of Cthulhu-esque form. There is certainly a sense of the Gothic in the exterior sequences, but the “dungeon” parts (which are the bulk of the book) are very dark Fantasy, possibly too dark for some as this book does verge on the potentially disgusting in places, but this is still Fantasy all the same. A good parallel would be with David Cronenberg films. It is too easy to simply call his movies “Horror” as they exploit a darker part of the human imagination, a sort of “Body Horror” that often involves a lot of stomach-turning slime and ooze. BNC is the FF version of a Cronenberg movie. It is the darkest kind of fantasy, too complex to be all-out Horror, but too nasty to be traditional “cosy” Tolkien fare. Put simply, there is something very interesting going on here in that FF is being moved into more adult territory that would herald the experimental and often structurally complex books that were soon to come.

The first thing that strikes the reader on embarking on this adventure is a sense that this is not going to be very easy at all. The first line of the introduction tells you that you have been captured in a net-trap which immediately puts you into a defensive position of peril. What follows is the need to get out of a prison cell, then to explore the Khul town of Neuburg and unravel whatever obvious nastiness seems to be hanging over the place. YOU play the role of a friend of the Margrave of Neuburg Keep so there is a human interest element in that you are fundamentally seeking to help an old friend out. The problem is you don’t know what it is yet that you are trying to help him out of and you need to establish what has happened to the town and then rid the town of the unknown unpleasantness. There is a malignant presence everywhere you go in the form of “Southerners” who wear desert-style robes and have partially-covered faces to add a sense of mystery. As you delve deeper you discover that they have “pets” called Blood-Lurchers which are horrific dog-abominations with tentacles and a serious bloodlust. These creatures stalk about at night which means the place is pretty much deserted after dark (all windows and doors are described as boarded-up), adding bucket-loads of atmosphere, which is both mysterious and worrying. Once you’ve explored the town you will inevitably find your way to Neuburg Keep itself which is where the adventure goes from being an atmospheric and unsettling mood piece to a genuinely disturbing goo-fest. But it does all flow logically and makes sense once you discover the nature of the source of the blight (an amorphous multi-appendaged jelly called Xakhaz.)

Given the sheer unfolding evidence of the nastiness of whatever is infesting the Keep, this book is understandably very difficult and you are set up from the word “go” as feeling rather out of your depth. It’s a sign of a tough FF that you can die at three different points in the opening half a dozen or so paragraphs (the beginning is actually extremely tough to get through on initial attempts) and there is no let-up at any stage, with instant fails/deaths around almost every corner (I count 47), numerous Luck tests that often lead to death if you fail, and the very neat inclusion of a new stat, Willpower. Unlike many additional rules in other books, the Willpower concept really adds depth to the flow of this adventure. You roll it up by rolling 1d6 and adding 6 (ie range is 7-12) and it is regularly tested once you enter the Keep in the same way Luck is tested, including deducting a point every time you test it. It works so well because it effectively controls your grip on sanity. Given the twisted imagery and hideous creatures that you face in the Keep a measure of how much it is all getting to you mentally draws you in very effectively. If your Willpower drops below 6 and you subsequently fail a Willpower test you will go bonkers instantly, and this can happen at any number of key points that either drive the main elements of the plot or that are just bloody horrible. OK, it’s very similar to Fear in House Of Hell, but it is more imaginative to lose by going mad rather than by dropping dead from fright and it feels more satisfying and appropriate in context. Whilst losing by failing a Willpower test is one of the more likely ways in which you will repeatedly find yourself having to start over, there are also four occurrences of extremely difficult tests against combined attributes, which is something rarely seen in FFs: there are two different situations that involve rolling 8d6 (yes, eight!) against your combined Skill and Stamina, a further scenario with 8d6 rolled against your combined Willpower and Stamina, and an only very slightly more forgiving roll of 5d6 against your combined Luck and Skill. The first three would give a rolled-up number range of 8-48 against a maximum combined attribute score of 36, and the marginally more lenient test gives you slightly more hope with a range of 5-36 against combined stats of maximum 24. This is an unusual idea for FF, but does come across as weighted against you.

What is quite interesting, though, is that, in spite of the very real difficulty of this book, there are some contrasting moments of generosity that make it feel fair, if undeniably very hard all the same overall:
  • ·         The rules do not mention any limit to your Skill score. Stamina, Luck and Willpower are explicitly stated as not being allowed to exceed their Initial values unless told otherwise, but Skill is not and if you can find certain helpful key items you can have a potential Skill of an incredibly high 18!
  • ·         Ditto, if you pass an “ordeal” early on, you can increase your Initial Stamina and Willpower by 2 points each
  • ·         Very few combats are especially tough and most enemies have stats under 10, meaning the usual lie about winning with poor stats is actually true here (although a high Willpower is pretty essential)
  • ·         The final baddie (Xakhaz) normally has incredibly high stats of Sk 14 St 32 which may seem interminable odds, but the Trident of Skarloz allows you to inflict -5 St damage on him in addition to the usual 2 (ie -7 per successful hit), drinking the Berserk Rage Potion ups your Skill by 4 points, and the Talisman of Loth reduces his Skill by 1, meaning, if you have all this kit, he is actually an enemy that can be killed quite easily. Plus, if you throw a green orb (bomb) at him he starts the fight with Sk 9 St 10 and then you can kill him in two attack rounds

Unusually as well (for such a hard book) is the realisation after several playthroughs that there is more than one route through this. The truest path certainly is far less dangerous, but is not very easy to find and is very tight, which makes the existence of the rather more perilous alternative routes all the more welcome and reduces the usual feeling of hopelessness that the books that lean towards the tougher end of the FF difficulty spectrum often leave you with after umpteen unsuccessful attempts. Naturally, this also adds more scope for re-playing even after completing the book and you will want to re-play this to experience as much as possible of its atmosphere and its best feature by far, its sheer inventiveness.

The majority of the encounters in this FF, especially those in the castle, are like nothing you will ever see in any other FF book and, if you can stomach them, they are well-worth seeking-out. The aforementioned tentacle-mouthed Blood-Lurchers act as an initial glimpse of the warped concepts that are to come further along, including a Snuff Hound (a hairless dog with a long nose), Chrabats (zombie mutants that look like frogmen), the Vlodbad (another multi-armed jelly that can sprout more arms each Attack Round), a Mutated Woman (the result of a viral experiment that has caused her to have, unsurprisingly, a mouthful of tentacles), the Bakk-Ruman (a legendary bat-humanoid-dog with massive blind eyes), and a crateful of animated bodyparts (with Stamina 18 as there are so many of them!) My personal favourite, however, has to be the Vitriol Essence, effectively the slimey embodiment of aggression that is not impressed at having been disturbed and does you -4 St damage with its acidic talons, which can then result in the pain driving you insane.

If all this isn’t weird/nasty enough, there are also some moments that border on being quite grim, especially the occasions where you have to ruthlessly kill children (one being the result of a failed Luck test at an early stage that more or less means you have lost much later on), an encounter in a prison cell with two people who have been infected with a disfiguring disease (the Mutated Woman and her slightly less disfigured brother) that you can potentially also catch, the amount of experimentation in general that Xakhaz has perpetrated on innocents, and the often macabre deaths that you can suffer, particularly those involving acid and/or corrosive oozes of various kinds, plus there are numerous opportunities to get executed or sacrificed.

An important point to mention, though, is that the often excessively graphic moments are off-set against a lot of very black comedy along the way. You can find a battle axe that turns you psychotic meaning you must always select the fight option if it is offered and you can never escape a combat (which can lead to killing some helpful characters by accident) although you do get a +2 Skill bonus if you have it, a Weightloss Potion that bans you from eating Provisions for the rest of the adventure, you can accidentally get turned into a tree, and/or can end-up being killed by becoming the target in the Southern “Warriors’ nightly “dropping a rock on the prisoner” game. Indeed, Peter Darvill-Evans’ writing is punctuated throughout with a wry darkly-humorous tone and he makes every effort to add as much depth and colour to his descriptive passages as possible (even if it does emphasise the nastiness in parts) and you really do feel the corrupting influence within the Keep, with its walls that drip slime, and its balance of both obviously abandoned and obviously in-use areas. His choice of vocabulary is intentionally oppressive and he seems keen to make sure that we appreciate just how many different words for “ooze” he knows, but it definitely pays-off and sets the exact atmosphere that he was obviously aiming for.

It is to PD-E’s credit that he also manages to design a well-structured gamebook. The Willpower rule works very effectively, as does the differentiation between your potentially sky-high Skill whilst restricting other stats to make you vulnerable whilst still giving you a chance of survival. There is a semi-ambiguity in how to use Provisions, but basically you can only eat when the book says so. Whilst on the topic of Provisions, we see a rare moment where your backpack comes into play – if you decide to take a piece of Blood-Lurcher mouth tentacle you will discover that it has taken its chance to eat all your supply of food whilst it was in your backpack. More black humour and an added cause-and-effect moment, which adds more logical depth to the proceedings. The initial section in the town itself is handled almost in a RPG fashion whereby you are able to visit all three parts in any order should you feel inclined, rather than being limited to one or two. Again this increases the routing and replay possibilities, and it is nice to see a FF that isn’t too restrictive and linear. Yes, there are three or four inevitable points along the way that all the routes will incorporate, but they are key to the plot and it would make no sense at all if you didn’t have to penetrate the Keep entrance somehow, or kill Senyakhaz (Xakhaz’ similarly-named female facilitator) to be able to access the underworld where Xakhaz is lurking, and one of the real design treats comes at this stage where you have a choice of two possible “routes” into the underworld, one which is a direct entry, the other (the more interesting one by far) involves rolling a die and either losing immediately, getting sent to the correct destination, being fired into another dimension entirely, and, my favourite, going back in time and having to re-defeat Senyakhaz and attempt the portal a second time. Very imaginative.

Even the title of this book is an intriguing departure from the previous FF norm of either a character heading (Space Assassin, Freeway Fighter, The Warlock Of Firetop Mountain, etc) an abstract overall location (The Forest Of Doom, Rebel Planet, Temple Of Terror, etc), or the plot-driving object (Masks Of Mayhem, Sword Of The Samurai, etc) in that the title is a very specific preposition telling you that you are going Beneath Nightmare Castle. No other FF title is quite so literal in its setting-out of exactly where you can expect to find yourself and it is all the more effective when you discover just how little you know about your mission in the early stages. To add effect, the cover is a well-drawn night image (dark blue and black hues with a massive moon in the middle) which adds to the “nightmare” idea, and the contents are certainly the stuff of nightmares. My only qualm with the otherwise very well-worked combination of cover art and title is the girl in spiked armour reaching threateningly towards you as this does not happen anywhere in the book (at least not like this, anyway.) Instead, if you find the girl, she is hidden in a cell deep within the Keep (not outside), is chained to the wall, is in tears, and you do not have to fight her. In fact, it is discouraged to do so and you are left feeling a little morally empty if you do kill her. However, should you pick up on it, incidentally, the victory section (400) can seem a little odd in continuity terms if you do let her live, as you are made heir to the Keep and no mention is made of her which is strange as she is actually the Margrave’s daughter. I guess the parts of Khul with Germanic naming conventions (ie the Darvill-Evans’ FF set parts!) operate the rather more traditional and archaic system of chauvinistic succession, then?

The internal art (by Dave Carson) is a mixed-bag. In parts it brilliantly visualises the hideousness of what you are faced with (lots of tentacles and dripping things, and the Bakk-Ruman gets a special mention for being a brilliant drawing), whilst in others it is a little too starkly black-and-white with only limited detail to bring things to life. If it is intended to emphasize the bright horrors against the dark dank insides of the Keep then this works well, but there are moments that could be more artistically fleshed-out here and there. On the whole though, your imagination is already running riot at PD-E’s lengthy descriptions of everything so you are probably less likely to rely on drawings to create the image. On a historical note, there was meant to be a picture of the Mutated Woman’s tentacle-riddled mouth, but it was censored out due to being too graphic – this book was (incredibly, considering its very lurid nature), after all, meant for children!

In summary, then this is a very good, if excessively horrific, FF book. It is very difficult, but is also very balanced and extremely well-designed. The extra rules actually add something for once and the intended effect and concept is so well-rendered that you can’t help but really feel involved in the story. It will take many attempts to beat it, but it rewards replays and, assuming you have the stomach for it, everything along the way is worth exploring. Well worth discovering and/or re-discovering.

Wednesday, 11 June 2014

Deadline To Destruction


DEADLINE TO DESTRUCTION

Gavin Shute

Reviewed by Mark Lain

Anyone who has read my thoughts on Appointment With FEAR will know that I see it very much as the “best of times, worst of times” of the series. On the one hand, AwF was a superlative example of the gamebook art-form in terms of design and construction, whilst, on the other hand, it was a terrible example of an “adventure” in its truest sense, being far too short, overly reliant on bad jokes and “knowing” references, and lacking anything of any real interest for you to actually do. This sequel, published in Warlock #12, carries over many of the ideas from AwF as well as exhibiting many of its pros and cons.

Conceptually we once again have a choice of one out of four Special Abilities (the same four as before) and we can gain or lose useless Hero Points that amount to nothing other than acting as a comparative marker of your performance as a superhero from one playing to the next. The Special Abilities have less of an overall effect on how the adventure plays out than they did in AwF, but there are still minor differences in what can happen and events you can access, plus the eventual solution is slightly different for each Ability inasmuch as the street where the end baddie (The Dynamo) is hidden will have a different number based on which supervillain spilled the beans which, in turn, depends on which Ability you have. However, other than these two plot drivers, the mission (to capture The Dynamo and prevent him from turning Titan City’s nukes on it) will otherwise pretty much be the same for each.

The Steve Jackson-esque numerical clue idea appears again and you get three initial clues based on your chosen Special Ability, but one of the clues is effectively meaningless so there are some slightly better combinations than others, not that it really makes much difference overall and no Ability is any better or worse than any other. But, a big difference this time is that the moments where you need to do the relevant calculations are very clearly signposted here, unlike in AwF where you need to be psychic to work out when to subtract x from a current paragraph number to pursue a lead, which naturally makes this sequel rather easier by comparison in that sense. By contrast, combats are fairly challenging with most key villains having stats in double figures, whilst The Dynamo himself has Sk 12 St 20 and does an additional -2 St damage on each hit he gets in on you (ie all hits inflict -4 St damage on you by default) unless you use an Energy Drainer (which I can’t seem to actually find anywhere) which reduces him to Sk 10 St 16 (still strong) and removes his double-damage effect, which is a relief. Staying alive in general isn’t all that difficult and unless you get shot or blown-up (in a 50/50 bomb diffusal situation that is actually very realistic for once, rather than unfair, in its apparent arbitrariness), staying alive is just as easy as it is in AwF. The failure by unmasking is back, but this makes sense too, and does add to the comic-book feel. The big challenge in AwF was in cracking the puzzle but that is all but absent this time around and DtD is generally quite an easy proposition to win. There seem to be a lot of Skill and Luck tests for a short subject, but this does show that, superhero or not, you are still mortal and fallible, which I like the idea of – think more Spider-Man than Superman (in fact, Spider-Man is even mentioned as your “rival” at one point.) There is one additional mathematical puzzle which can only be found by taking a particular route and which is vital to success, but the calculation is, by FF standards, simple to do.

The mechanism whereby you should avoid killing your opponents is back again (reduce their Stamina to 1 or 2 and they surrender; kill them and you lose 1 Hero Point) as is the text’s failure to deal with their deaths and blanket assumption that they are always alive and able to blab to you after each combat, regardless of what actually happened. You would have hoped that this would have been resolved by the second instalment but the theory must be that you will never kill anyone as that would be out-of-character. A sensible idea in context, but ultimately nonsensical in continuity terms.

On the subject of continuity, the intro makes direct reference to your having captured The Titanium Cyborg in AwF (there’s even a picture of you doing this) and you are Jean Lafayette/The Silver Crusader again here. For some reason, though, you are not given the option to re-cycle your same character from AwF and continue from where he/she left off on finishing the previous book. There’s nothing to stop you doing this in principal and it does make sense to do so, even if you might be restricted to a particular Special Ability or a hopelessly low Luck score (which would give you little hope of winning), but, as we have seen, the nuances of winning with each Ability are far less impacting here than in AwF so wouldn’t really detract any and would probably make this feel more like an ongoing comic book saga.

AwF’s art made much of the comic book association, but this is less obvious this time around with less multi-frame images to visualise an episode (although there are lots of “BOOM” and “SWOK” intertitles) and this does diminish the affect a bit. The art is very clean-lined and bright, though, so there is a nice cheerful (and slightly manic) tongue-in-cheek comic book (as opposed to something dark and brooding as with the more serious-toned comics) look to the pages. The rather silly popular culture references are very much in abundance again, but they feel less forced and awkward this time in that they seem to be trying less hard to be funny and therefore slip into the text better. Yes, the fairly crappy super-villains are back (mostly animal-based this time, bar the Mr Freeze clone called Mr Frosty – a link to The Ice Queen in AwF, incidentally, which adds more continuity between the adventures) as are the plot devices of going to work, visiting a few sights, and going home to rest (a lot), meaning the mission per se just involves wandering around Titan City looking for clues as to The Dynamo’s whereabouts again, but DtD has a far longer core part before you are faced with needing to crack the puzzle’s secret. AwF had 440 sections, but played-out (without finding the hidden parts) in what seemed like about 10 paragraphs. DtD is only 200 paragraphs long, but the basic mission is much longer and you feel less short-changed even if you haven’t found the numbers you need to get to the main villain at the end. There is more to see and do in DtD and, due to its being less reliant on secret sections, it is more linear in approach. There’s even a follow-on to the episode in AwF where you could buy a copy of WOFM, wherein you find some FF books in a shop (which you have no idea what are!) and your informant, Gerry the Grass, tells you AwF is really good – cheap plug or open acceptance that sequels aren’t generally as good as the first parts, maybe? Or perhaps just a nice tribute to Steve Jackson from DtD’s author?

There are a few odd moments along the way that are inconsistent with the general flow, especially the lack of a Hero Point penalty for not bothering to apprehend Elastic Eddie (which is essential to get the main part of the secret code for the end) when failing to take any other super-villains in will affect your Hero Points, plus, as with most Warlock mini-adventures, there are a few (possibly only two, in fact) mis-linkings of sections which is frustrating, but this effort does seem better proof-read than most of the Warlock FFs, so we’ll count this as progress.

When I was younger I much preferred DtD to AwF. Once I’d figured out how to beat AwF and discovered its brilliant but complex design I have to say that DtD’s far more conventional linear approach makes it structurally much weaker. That said, as a straightforward adventure to be played through to completion in a couple of hours without the frustration of having to keep quickly failing and re-starting over-and-over, DtD certainly has some merit and it is more satisfying in that sense as it relies far less on your needing a sixth sense that tells you when to use your clues. There is less variety this time and there is essentially only one general route through regardless of your Special Ability (although slight digression is allowed if you want to keep it fresh on subsequent playthroughs), but there is still fun to be had by playing this FF. AwF fans will probably be pretty unimpressed by DtD, but those who want a simplified superhero adventure that doesn’t melt your brain as you try to fathom it out will find this an acceptable variation on a theme.

Sunday, 11 May 2014

#43: The Keep Of The Lich-Lord


THE KEEP OF THE LICH-LORD

Dave Morris and Jamie Thomson

Reviewed by Mark Lain

The combined gamebook achievements of Morris (Blood Sword, Fabled Lands, Virtual Reality, etc) and Thomson (Falcon, Way Of The Tiger, DuelMaster, etc) are not to be under-estimated and the prospect of a co-written FF by them both is a mouth-watering one. This is Dave Morris’ only completed/published FF entry, whilst Jamie Thomson had previously brought us (with Mark Smith) two impressive FFs: #11 Talisman Of Death and #20 Sword Of The Samurai. Expectation is high, then, for what should be a brilliant book, considering the talent and pedigree of the writers.

I always like to glance at the Adventure Sheet before I start ploughing through the rules so that I can prepare myself for any interesting or confusing new stats or mechanics to contend with and there is nothing new on this one, which suggests a conventional old-style FF (unusual for a later release.) However, on reading the rules we discover TWO new stats that are nowhere to be seen on the Adventure Sheet which means you need somewhere else to keep track of them. Annoying. Even more annoying is that it quickly becomes apparent that bothering to record these extra stats is a complete waste of time as they are highly unlikely to have any bearing on anything! Resolve is another name for concepts we have seen in other FFs such as Fear, Faith, Willpower, etc and is your ability to hold fast when faced with the Undead rather than freaking out and not being able to do anything useful. On first reading the explanation in the intro, it seems that this might be out to scupper you pretty quickly – roll one die and add 5 (ie the highest this can go is 11) – but when you read on, the cracks start to show through. When you have to Test Your Resolve, you need to roll under your Resolve on two dice. With a ceiling score of 11 this seems quite tough, but you then get to increase your Resolve by one point every time you are successful. Conversely, you have to reduce it by one if you fail, but the odds are definitely in your favour once you start getting a few lucky rolls and it goes up, or if you start with a high Resolve anyway. To make things a bit easier, your Resolve can never drop below 2, but it can exceed your Initial Resolve, finally being capped-off at a maximum of 12. As Resolve tests are fairly common, it won’t take very long to reach a Resolve of 12, which makes any further rolls against it redundant (or it might even be effectively redundant from the outset if you start on 11) and therefore takes away the element of terror and uncertainty when faced with the Undead (which is presumably what Resolve was designed to highlight.) The second new, and even more badly exploited, stat is your Alarm Value. This only comes into play once you have reached the final stage (Bloodrise Keep) and tracks how much unwanted attention you are drawing to yourself as you try to find the main baddie. A good idea in principal, especially as the Undead in this adventure are a sort of collective consciousness that die if their leader dies so you would assume they will know if any of their number is being attacked, but it is highly unlikely that your Alarm Value will increase enough to cause you any real problems and there is only one (literally) life or death checkpoint where it will make any real difference to you, and even that is easily avoided. These stats were evidently designed to add foreboding in the environment and a sense of care/urgency to your actions, but they are both so easy to survive that they are rendered almost completely ineffectual.

...And therein lies the root of this book’s (only real) problem: it is just too damn easy and makes the FFs that are regarded as uncharacteristically straightforward (in particular #29 Midnight Rogue, #3 The Forest Of Doom and #34 Stealer Of Souls) actually seem like a challenge. In KotLL pretty much everything is laid at your feet and you do actually have to make quite an effort to fail:
  • ·         Moments where, in other FFs, you would almost certainly expect to die instantly, only result in slight chafing here (eg: being hit full-on with an arrow causes -2 St, as opposed to being fatal, which in reality it probably would be!)
  • ·         You can very quickly acquire various weapons to make you extra-dangerous in battle: your sword can be sharpened to always inflict -3 St in combat, you can find a spear that always does double damage to Undead AND a shield that reduces Undead foes’ Skills by 1 (which, in an adventure where most of the encounters are with the Undead, is a bit over-lenient!)
  • ·         A particular route can lead to you having a Luck of 16, which makes Luck tests frankly ridiculous
  • ·         There are only 17 instant deaths, almost all of which are for doing bloody stupid things that you would be unlikely to attempt (or by failing Luck tests, which you will struggle to manage to do once you reach the stages where failure becomes fatal)
  • ·         If having a potential Luck of 16 and superhero-type weaponry at your disposal isn’t enough, there are umpteen opportunities to improve/replenish your stats (including several increases of your all-important Resolve score)
  • ·         There is very little combat needed in the early stages and it is possible to get to the end with still only a handful of encounters that can only be resolved with a fight
  • ·         There are three different ways to kill the end baddie, all of which are mutually exclusive, and two of which will just kill him outright without the need for combat, Luck tests, or in fact anything that would constitute an effort to prove yourself
  • ·         There are no essential items that success or failure will be dependent on. OK, there are some items that will make life easier for you, but it’s not as if it’s going to be particularly hard here anyway!
  • ·         Finding the end baddie is very easy. He is in two different possible locations, based purely on which way you go, but hiding isn’t his strongpoint and he comes to you whatever you do so you don’t have to search very hard for either of his locations (and failing the only important Alarm Value check will only kill you outright in one of these places)
  • ·         There is no true path, primarily due to the absence of any key items, yet it is also possible to visit almost every location (bar the battle site, where nothing happens anyway) on the way to the final section should you feel inclined. Alternatively, you can take the shortest possible route (which will have no comparative effect on your chances of success) and finish the book in just over 35 paragraphs, making it also potentially extremely short
  • ·         Although everything that you can buy here is unusually expensive (min 25/30 gp for the cheapest stuff, rising to 60/70 for some classier items – er, none of which you really need, of course), the book is very generous in terms of giving you large stashes of money along the way, plus you start out with 25 gp anyway
  • ·         The most successful set-piece of this book takes place in a graveyard which houses a nest of vampires that are terrorising a local village. If you choose to visit it you would anticipate that surviving this is not going to be an easy task. However, in KotLL even a vampire infestation is easily sorted out as you can take either one or two NPC companions with you (who hate each other, to add a bit of tetchy interplay to the proceedings) and you can let them do some of the fighting for you. Add to this the fact that, even though you are racing to find the vampires before sun-down, there’s a very good chance that you will find them as they can be found in at least three different locations (each of which will have different effects on them), removing the thrill of the chase somewhat

On the plus side, the vampire cameo is just one of a large number of (optional) sections of this adventure that really make it come alive and it is through vivid writing, combined with genuinely worthwhile things to see and do, that this book really deserves to be played and re-played, not to try to win (which will disappoint and take no effort at all), but to experience just how much colour and atmosphere has been written into it. Everywhere you go (bar the non-event that is the battle site) there is a game-within-a-game for you to play, be it vampire-hunting, ridding a village of a bizarre beast that is eating the inhabitants, foiling a pirate slave ring, visiting a safe-haven woodland full of refugees, discovering the remnants of a long-dead ancient race, or infiltrating the keep where the main baddie is holed-up. Anyone who has ever played any of Dave Morris’ Blood Sword gamebooks will be familiar with his use of extremely evocative language, lengthy descriptive paragraphs, and an atmosphere of foreboding that starts mysteriously and then grows ever more oppressive as the game progresses. Morris and Thompson’s books are often quite complex in vocabulary terms and also in design and are aimed at more mature readers, but this makes for a very immersive experience and the environment in KotLL is very well constructed. Much thought has gone into both the back story to current events and also the history of the setting in general and you really do feel this world as you discover its past and present along the way (there are even two locations with National Trust-style explanatory commemorative plaques telling you all about what happened there!)

The actual mission here is to rid an island (Stayng Island off the far east of Khul) of an undead necromancer (the luridly-named Lord Mortis) who has been accidentally-deliberately re-animated after 200 years lying dormant and has made short work of turning many of the island’s inhabitants into his undead minions. He has already taken the Northern part of the island based around Bloodrise Keep (where he has imprisoned the island’s former Castellan) and YOU are a mercenary hired to kill him off. Yes, this is fundamentally another lunatic-of-the-week effort where all you need to do is assassinate the madman, but there is far more depth to it than just that and, for once, your character comes across all the way through the book as simply being in it for the money, rather than as a do-gooder, which perfectly suits the idea that you are a mercenary. There is a sub-plot where Chaos Pirates are working with Mortis to enslave the locals to make capturing the island easier, and many people are leaving while they still can (via your initial landing point.) You discover a sort of Elven resistance movement (who’s demi-God just happens to be in Bloodrise Keep as well) and you also have to deal with a traitor situation, your handling of which will affect what happens when you reach the Keep (well, a little bit anyway.) The aforementioned optional Vampire hunt is actually to despatch Mortis’ wife (Lady Lotmora), which adds a sense of anticipation and acts as a support act to the main event of bumping Mortis himself off, plus you can visit his (empty) tomb to get an idea of what to expect when you find him (and also to get one of the two different items that can kill him without you having to lift a finger.) A really inventive moment comes when you visit a temple that is an archaeological remnant of an ancient civilisation that once lived in the island. The main item you take from there is the Elixer Of Lhyss, the effects of which are different based on your die roll when you drink it – the result can be good or bad (there are three outcomes) which adds an element of surprise on re-plays and is a nice change to the usual situation with drinks in FFs where you are normally totally at the mercy of the writer’s generosity or sadism.

The logical yet multi-layered premise (which is not all presented on a plate, but rather, unfolds as you discover parts of it) gains extra credence from its encounters. As the island is being over-run with Undead, most of what you meet is exactly that and this is what you would anticipate from the restrictive environment of an island. There are more “normal” people in the untouched South than the already devastated North, and the further you progress, the nastier your foes become. Combat encounters are fairly sparse, but those that you come up against are interesting and in context, if sometimes a little bit weird (Werewight, Whipperwolf, Skull Beast, etc.) The Keep itself also has a lot of cannon-fodder Skeletons and the like which, again, makes sense, as it’s the garrison for Mortis’ undead army.

There is a minor structural criticism in that there are a lot of “cut-and-paste” sections but, as these deal with alternate versions of the same thing (eg: whether you have one or two companions in the graveyard, or whether you spend too long getting to the quayside), this is forgivable as it avoids the problem you sometimes find in FFs of having/doing something that is impossible based on the route you have taken to reach that point. There are also a few “knowing” inter-textual references where you find pubs called the “Sword of the Samurai” and “Down Among the Dead Men” which are cute but also a little bit pretentious (although there is nothing wrong with product placement on the authors’ behalves!) Rather more cleverly, you can find a stat-boosting sword (if already potentially having a razor-sharp one is not enough for you) that was made in Hachiman (the setting for Sword of the Samurai) and I always like to see evidence of cross-referencing to aid the creation of a global FF world. There is a grating aspect as well, though, which suggests that the adventure had been re-thought at some point during its creation, in that the overall island group and its Alliance changes its name part-way through, but you may or may not even notice this. Also, you are given what the book calls a very important ring (the Ring of Communing) by your sponsor at the start and you would be forgiven for thinking this will prove pivotal in the adventure. Sadly, it has no real impact on anything (you can even lose it and it makes no difference), other than to give you a semi-useful clue to beating Mortis at the end. For the most part, you just find yourself getting yelled-at for using it at the wrong times and, in one of the few moments of bad continuity, it works in paragraph 400 regardless of whether a) it has any charges left in it, or b) you even still have it!

A book with such well-rendered atmosphere and theme needs art that is equal to that and David Gallagher’s internal drawings are very dark, in keeping with the prose. Monsters are very stark whites on very shadowy backgrounds which make them seem all the more horrific and there is an intensity to many of the illustrations that suits this book in my view. The cover is curious as nothing is really happening on it (the title takes up a lot of the available space), but it shows Lord Mortis as a huge, almost Napoleonic figure dominating his hordes, which is subtle yet strangely appropriate.

This book’s excessive ease is at odds with the atmosphere created and the general themes. It is very well-designed and exceptionally well-written. Its non-linearity, with no particular true path, and relative freedom of movement, make a refreshing change to the usual very specific route you need to normally find in FFs, and the sheer quality of this book as an adventure (as opposed to a game that you need to win) raise it well above just being written-off as “far too easy.” Granted, it is very very simple to beat, but at least there is variety even in how you can easily beat it! The new stats are a failure when they should have driven the plot devices, but for once we have a book that can be completed with low stats, and this entry has so much to offer that, in spite of being stupidly easy, this is still a great gamebook as well as a great piece of fantasy fiction.


Sunday, 27 April 2014

In Search Of The Lost Land


IN SEARCH OF THE LOST LAND

Ruth Pracy

Reviewed by Mark Lain

The second part of Pracy’s trilogy of adventures ended with the promise that “The next part of this epic will be published in Warlock in a few months time”, then Warlock ended at Issue 13 which left us all wondering whether Part 3 of the story would therefore ever appear, or at least it did if you hadn’t given up on this trilogy after the lacklustre second instalment and decided you really couldn’t care less whether the demise of Warlock meant we’d never get to see this one out. Strangely enough, nine months after the final issue of Warlock had been published, the magazine it had made no secret of its antagonism towards, Proteus, finally printed the missing third episode of Pracy’s “epic”, albeit using a set of “different” rules.

Part 1 (The Floating City) was set in an icy wilderness and was reasonable, whilst Part 2 (The Land of Changes) took place in a forest and was dull, and thus Part 3 takes us into a third textbook fantasy adventure environment, starting in a very convoluted dungeon that zig-zags off in all sorts of directions and even goes around in circles in places, before giving us a site-seeing tour of Norse legends once we approach the Lost Land itself. The initial dungeon section is fairly standard fare with North-South-East-West options, items to collect, and a lot of doors that have a habit of closing behind you forcing you to carry on forwards. This is probably the most linear of RP’s three efforts, although this is semi-disguised by the sheer amount of floating around, passing out, and being generally transported about that happens here. Certain items are essential to success (eg: it is possible to find yourself looping around endlessly in the dungeon if you can’t find a silver wristband, until you take a wrong turn and die, that is) and the Lost Land section is only slightly less linear than the beginning part, leading you through volcanoes and ice, with the only real option being whether you go via some Giants or not, but it does at least offer some slight variety and sits somewhere between the multiple-route design of Part 1 and the very specific true path approach of Part 2.

Interestingly, other than its huge reliance on Northern Hemisphere mythology, one or two examples of items coming and going regardless of what you do, and the return of Pracy’s sometimes insulting jibes at the player (section 130 is one of the worst failure paragraphs I’ve ever read in a FF), this offering is rather different structurally and conceptually than Pracy’s previous adventures:
  • ·         There are far less unique creature types this time
  • ·         There is far less need to make allies and you can more easily get away with killing
  • ·         This is much more dream-like and feels almost like the Grail quest scenes from Excalibur
  • ·         There are hardly any “non-win” alternate outcomes, but there are numerous instant deaths which otherwise tend to be a rarity in Pracy’s work
  • ·         Typos, bad grammar and mis-linked sections are largely gone (enough to not be distracting) making it seem that more care has been taken in the execution
  • ·         Most worthy of note is that there is far less paragraph wasting (but still a small amount) and sections are generally longer and more descriptive as if this is designed to feel more fleshed-out and climactic

(Presumably) as this was not a Games Workshop/Puffin publication, the rules have been altered (sort of) which means you could play all three adventures and use a different rule system for each, given that Part 1 uses FF rules only and Part 2 allows for either FF or D&D rules to be used. Unlike Part 2, you are not given the option to carry over your character again (which does detract from continuity when playing through the complete “epic”), but it wouldn’t take much imagination to translate your FF attributes into those used here. Skill is re-named Dexterity and Stamina is called Strength – as these are rolled up in exactly the same way as their FF equivalents and cannot exceed their Initial values, these are directly interchangeable so the adventure’s FF origins are only very thinly disguised. Ditto, Rations which restore 5 Strength points are more generous than FF, plus you start with six and you are not restricted as to when you can eat (outside combat, naturally.) Oddly, no other starting equipment is mentioned, but you can assume you have a sword, armour and a backpack otherwise you are going to struggle! A more radical departure from FF rules is the complete removal of any concept of Luck, but you do get Wisdom instead which plays its part very well – you are often required to roll against your Wisdom (ie test it) to determine if you are worthy enough to progress, particularly in the final stages and there is a suggestion of your character having developed from an impetuous chancer in Part 1, through proving your worth via an old sage figure in Part 2, to discovering a sort of Promised Land in Part 3 (overtones of Star Wars, maybe, but this self discovery tale is used all over the place in popular culture so it would be unfair to call this plagiarism.)

Whilst on this subject, this third part of the story arc carries on directly from Part 2 and you start still in the company of Gether, with the Moss Maiden’s challenge compelling you to seek out the Lost Land which contains (you discover) the legendary Stones of Sariram that hold the source of Gether’s land’s power. The opening dungeon trawl is the caverns that were referred to in Land of Changes, then you travel through The Stupa Of The Lost Land to the other side of Winter (is that not back where you started in Part One?), and finally discover the Lost Land itself which, given that it is peopled, seems to have already been discovered before you got there (although it is a land of legend, rather than a New World.) There is nothing out of place about the plot of this (or the trilogy as a whole) and weirdness is made acceptable by the generally mystical feel of this adventure, especially the latter half which you would expect to be pretty unusual considering its mythical status. The sheer weight of Norse material that comes to the fore in the final parts is laid on a bit too thick (Miollnir, Ragnarok, Ginnungagap, Heimdal, Bifrost Bridge, etc) and whilst it does not affect the plot or the gaming experience, it can feel like you have long since left Titan and are now on Earth. I accept that it is not explicitly stated anywhere that this series is set in the FF world of Titan, but it can be assumed that it is meant to be (I think?) to make it more in keeping with the canon.

In terms of challenge level, this adventure is not especially difficult, but it can get rather muddled and confusing the first time around. I assume the sense of disorientation is deliberate and certainly makes mapping a nightmare with areas looping onto each other, but it is interesting to find a FF where the sense of the mystical renders it tough to get your head around (as a Lost Land of legend should) rather than just contending with tough combats and needing a catalogue of items to win. Yes, there are some key items to find, but as this is pretty linear you will easily find them all after only a few attempts. Creating a mental image of some of the locations you visit can be bewildering (think Journey to the Centre of the Earth, which created similarly impossible scenes in my head when I read it) and there is a gigantic scale to some of it to give you a sense of your small-ness compared to where you are (literally, at one point when you find yourself in a Giant’s glove!), but you are basically dealing with a sense of awe and vastness, rather than fighting for your life. To keep it in context there are some combats to be fought, but none are especially tough (the Garm, which is meant to be hell-spawn, is very weak with De 7 and St 3 but you meet it very early on and you don’t really want to feel like it is a lost cause that soon on) other than an incredibly strong Mountain Dwarf who has St 20. It is possible to choose to fight some very tough figures from legend (Heimdal and the Fenriswolf) but this is not essential and you will benefit from taking other options to get by them, whilst the most impressive encounter by far here would be with Heruka (who has three heads and six arms, each holding a different weapon that you must individually beat one-by-one), but if you defeat it you will lose the game anyway so my theory that there are no unreasonable combats required becomes apparent as you trace the true path over several failed play-throughs. Re-playability potential is pretty high as the sense of spectacle carries this one through and the idea of building a character up to be worthy enough to find the Stones of Sariram is compelling in itself. It’s not often (other than in those FFs that involve faith- or sanity-based attributes) that FFs require you to prove your worth in this way and this is a really appealing part of ISotLL. Similarly, it is possible to fail on your first choice, which might seem harsh but a) you are supposed to be worthy, and b) playing either of the previous instalments which give you a huge clue as to how to avoid this.

When you do beat it, there is an open ending for a fourth part that never happened, which I am glad of as this is climactic and spectacular enough to be a suitable ending to the series, plus there is a limit to how much of Pracy’s wholesale exploitation of myth we can realistically tolerate and this is definitely as far as it needed to go whilst still holding an interest for players. Pracy clearly values her source material and wants us to get something from it as well. In Parts 1 and 2 her writing style was arch and felt overly smug. In this adventure, she tones it down and lets the descriptions of the environments speak for themselves rather than sounding like a bombastic GM that you’d rather not have to deal with more than was necessary, which again makes this one much more tolerable and enjoyable to play.

The art (by seven different artists) has more continuity to it than the number of illustrators involved should suggest and there are some very impressive images with a real sense of awe and/or terror in them. Some pictures have a sketchier feel whilst others are more realised, but it all works well to my eye. The cover depicting the final episode (by Keith Berdak) is rather less effective and seems over-simplified compared to the rest of the art and rather understates the importance of what it depicts.

As an aside, Proteus’ presentation was less focussed than Warlock’s and this makes reading/playing the game rather disjointed as you have to find your way through a minefield of incidental advert pages that would be better placed after the main event. This is more of a hindrance than an issue, but it is still noticeable as you flick backwards and forwards looking for the paragraph you are turning to.

This is easily the best of Pracy’s trilogy, generally avoiding the irritants that detracted from the previous two. It is the most eventful and certainly the most imaginative, but is also the most reliant on legends for its material. You get a sense of place more easily and it is far easier to immerse yourself in the world around you. There are some flaws, but overall this is an interesting effort which requires close and repeated reading to properly appreciate the setting and concept. The post-dungeon part is much more worthwhile, but the contrasts between the sections suit the plot and add to the impact of the latter parts. You could easily play this without bothering with the first two adventures and it would still be good, but there is something to be said for working through the whole cycle to find out how it all pans out, plus it will definitely make Part 3 seem all the better. Far from perfect, but still a decent offering (if only it had a less inane title...)


Sunday, 20 April 2014

The Land Of Changes


THE LAND OF CHANGES

Ruth Pracy

Reviewed by Mark Lain

The second part of Warlock reader Ruth Pracy’s trilogy that started with the snowbound and slightly mystical The Floating City was published in Warlock #11. Set this time around in the interim area that links the first part’s Winter with the final part’s Summer, this adventure takes place in what is basically little more than a forest that lurches violently between Spring and Autumn environments. This transformation process is known as “The Changing” and the intro goes to great lengths to make out how dangerous and unpleasant an experience getting caught up in the middle of The Changing can be. In keeping with the first adventure’s opening spiel, it also pompously sets the scene for what actually seems like quite an intriguing descent into the unknown. Unfortunately, this second instalment is rather weaker than the first (which was functional, but certainly no masterpiece) and is probably one of the least interesting short subjects to be published in Warlock magazine overall.

Unusually for FF, you are given the opportunity to carry over your (presumably victorious) character from the first part, but this presents several issues. Firstly, do you assume that you are fully healed following the rest period that the intro mentions and that you qualify for the full complement of potions and provisions that the rules tell you you have, or do you re-use your previous character in the exact condition that he/she finished Part One? Following on from this quandary, this adventure can be played using either FF or D&D systems. This is a nice idea as Warlock was keen to promote role-playing in general in its later editions as opposed to just being a FF magazine as it was in its early days, and this gives you options for how you wish to approach the mechanics of your adventurer. On the downside, using D&D rules totally precludes you from using your previous character and takes away any sense of continuity between the first and second parts of the story, plus using D&D rules makes the adventure less involving as there are some situations where only FF rule users can gain or be penalised in stat terms making the FF approach feel more nuanced than the D&D route (especially with Luck adjustments.) I suppose as well that the usual problem of how to handle dying comes into play here – if you die in Part Two do you go all the way back to the beginning of Part One again, or do you just carry on from the start of TLoC without having to go through a full re-tread to get back where you are? (I’d imagine most would plump for the latter.)

A criticism of Part One was its sometimes clumsy construction, and that is certainly the case again here, even if this time around you are allowed to eat without being instructed by the text (which is good as this means that you can actually eat this time!):
  • ·         The rules mention testing your Skill or Stamina, but nowhere in the text are you required to do either of these (I can find 8 Luck test sections, but that’s it)
  • ·         The true path (and most of the false ones) are all very short, meaning there are several multi-paragraph episodes that could easily be cut down into one making the adventure take up half as many sections whilst still being exactly the same
  • ·         There are lots of typos and textual inconsistencies, including a shambolic opening ramble that states “who knows where you came from”, then, er, promptly tells you exactly where you came from
  • ·        It’s probably a proof-reading problem (and Warlock certainly had plenty of these!), but the punctuation in this adventure is insane, with rogue commas in particular turning up all over the place, making it read very awkwardly and disjointedly – an adventure should be fast-moving and vivid to draw you in, not such a grammatical mess that you spend as much time trying to understand the sentences as you do trying to feel like this is happening to you
  • ·         Due to the messy structure and lack of play-testing, there is an additional (and I suspect quite important) alternate (“failure”) ending (paragraph 72) that you cannot reach as it has no linking section, but does result in you finishing up in the Summer lands, which is where you are trying to get to

The flip-side of the Pracy-esque cons is the nicer touches that she also always includes in her adventures:
  • ·         You need to gain allies and behave yourself even more in this adventure than in Part One, and the psychotic approach is very much discouraged in favour of using some intelligence to negotiate the key moments and choose your moves wisely
  • ·         The true path is not as easy to find this time around (and there is only one as far as I can tell), even if it is disappointingly brief when you do finally figure it out
  • ·         You need several items again this time and they can be quite tricky to get hold of (until you figure out how to ingratiate yourself with the locals)
  • ·         The interesting feature of “non-win” endings is used again here where you achieve a “victory” of sorts but not the desired outcome, which does encourage you to try to find the optimum ending, although several of these are rather obscurely sign-posted and you will have to make some 50/50 calls that will lead to either victory or failure without you really understanding why
  • ·         A particularly neat inclusion is that you can acquire a horn that allows you to escape instantly from the entire forest in various moments of peril. OK, it’s just another way to get to more “non-win, but alive” endings, but it’s an interesting concept

Whilst your actual mission is simply to safely reach your homeland (Summer), the real point of this instalment is to meet a Moss Maiden who gives you your mission for Part Three and tells you that you are the chosen one who has to find the fabled Lost Land. You have to prove that you are the person she seeks and you do this by generally behaving yourself and making a couple of correct key choices at the right testing moments as mentioned above. In adventuring terms though, this means that nothing much happens on the true path other than you accepting the mission for Part Three and this adventure is basically just a fairly mundane bridge between The Floating City and In Search Of The Lost Land. Even the much-advertised “Changing” only happens on the incorrect routes and, whilst it is disorientating and its description does make you feel as sick as your character is meant to feel, it’s a bit of a let-down that you aren’t actually meant to witness it, even if the opening section’s warning is probably intended to alert you to the fact that the true path avoids it.

Similarly, of the always imaginative (and unpronounceable) unique encounters included here (and these are a big plus of RP’s FFs), two can only be found by going the wrong way (the very tough windy beast called a Mazzamarieddu, and the Fechan), whilst the true path is dominated by the Moss Maiden and a group of mischievous but actually very helpful dwarf spin-offs called Brownies (and their evil cousin, the Redcap, which is described as horrific but just looks cute in its picture.) There is also a potentially intriguing encounter with the Gwyllion late on, which provides another challenge, but you might just be starting to get fed up of this adventure's mental tests by this time.

Other than the tough battle with the Mazzamarieddu (which you might as well try to lose as you’ve already lost the game if you’ve met it anyway), the main challenge in this adventure is to make the correct non-kill choices and find the ultimate ending by using your intelligence rather than your sword-arm. There are two excessively harsh moments, one involving an aging curse where you lose 3 Skill and 6 Stamina permanently, the other being a pillar with a choice of four runes where three will lead to instant deaths (including the one you seem to have been told is the right one), but otherwise most of the failures are through finding a survival ending other than the one on paragraph 200, which is a refreshing change for FF even if there are rather a lot of non-win outcomes in this adventure.

As was generally the case with later Warlock mini-adventures, the magazine’s cover image is nothing to do with what is going on here, but Pete Martin’s art within the adventure itself is really good, being full-framed, atmospheric and very highly-detailed, which is especially helpful as the encounters here are mostly unique to this adventure. The key items you need make up the bulk of the incidental between-text smaller images, but this adds flavour and gives you useful hints for when you have failed umpteen times and are trying to work out exactly what you need to find to beat this mission. I am pleased to say that Pracy’s text is less curt this time around, there is much more dialogue (especially with the Moss Maiden), and you do not feel quite so insulted when you make a bad choice.

Despite having some nice touches (especially the art, the need to use your brain, and a sense of environmentalism), there is so little actually going on here that it does make this a rather empty experience if played in isolation. As an interlude between the other two parts of the story it works fine, but it is just too short on substance to be considered an adventure in its own right. If The Floating City captured your imagination, then it’s worth carrying on with the story, but this just does not stand up on its own.